Finding a Potato Masher That Works with Your Pots and Grip

Product links are for reference. Verify current details on the retailer page before buying.
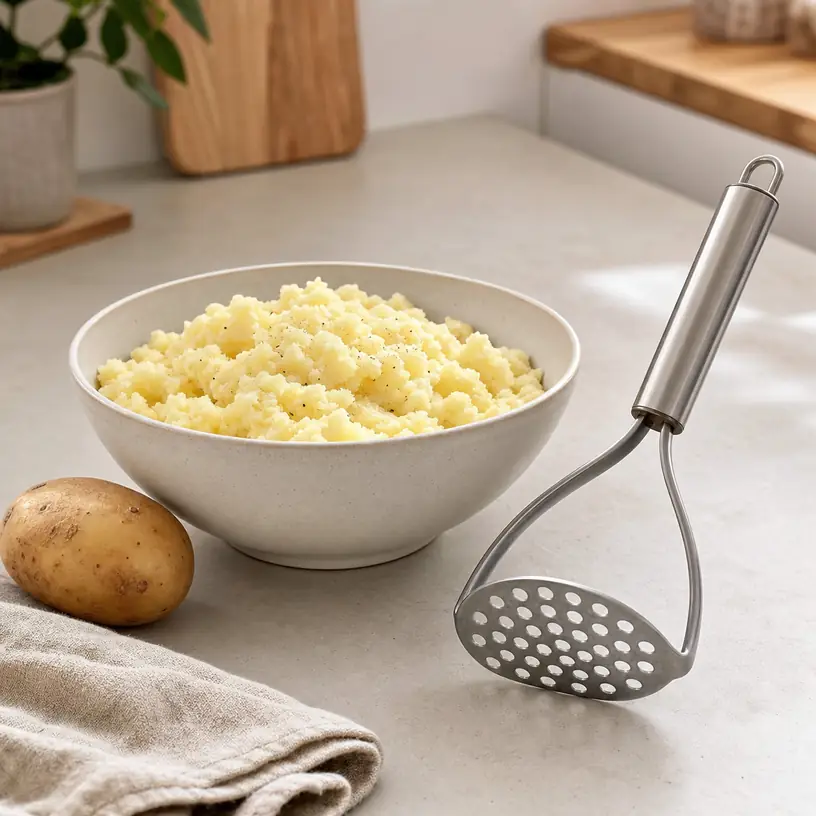
Illustrative image of a generic manual potato masher beside a bowl of roughly mashed potatoes

Illustrative image, not an official product photo.

Short answer

Start with the cookware, batch size, and finished texture rather than the masher’s appearance. A broad perforated plate can cover the bottom of a roomy pot quickly, while a compact zigzag or wavy head may reach more easily inside a small saucepan. The handle should keep your knuckles clear of the rim and let you press downward without bending the wrist sharply. Look closely at the junction between head and handle, because cooked potato can collect in narrow seams. If you want an exceptionally smooth result, compare a ricer or food mill as well; a manual masher is better suited to direct, controllable crushing than perfectly uniform purée.

Search reference

Manual potato masher options

Compare head width, perforation or wire pattern, usable handle length, cleaning access, and the dimensions of the pot you normally use.

View matching options

Begin with the pot, not the utensil drawer

A masher has to move freely inside a real cooking vessel. Measure the flat area at the bottom of the saucepan or Dutch oven you use for potatoes. Then account for rounded sides, rivets, and any insert that narrows the working space. A large head may look efficient in isolation yet leave an untouched ring around a small pot. A small head reaches corners more easily but requires more presses across a family-size batch.

Depth matters too. A short tool can put your hand close to steam and the hot rim of a deep pot. An extra-long handle creates distance, but it can be harder to control and may not fit the intended drawer. The useful measurement is the working length from the top of the mashing head to the comfortable grip area, not simply the overall product length.

Think about the vessel’s interior finish before pressing a metal utensil against it. If cookware guidance discourages metal tools, compare a masher whose current material description is compatible with that surface. Do not infer scratch resistance from a colored coating or product photo. The cookware maker’s instructions and the masher’s stated use are the relevant checks.

Choose a head for the texture you like

Manual mashers commonly use one of several head layouts. The distinction affects how much food passes around or through the tool with each stroke.

A perforated plate provides many small openings across a broad area. It can break cooked pieces down consistently, although soft potato may pack into the holes and require rinsing from both sides. Check whether the plate is flat, slightly curved, or angled relative to the handle, since that changes how it meets the bottom of the pot.

A wavy wire or zigzag head has larger open spaces and fewer enclosed holes. It may be easier to clear under running water and can leave a deliberately rustic texture. Wire spacing, head width, and stiffness vary, so the shape alone does not establish how quickly it will work.

Some designs use a grid or mixed pattern between those two approaches. Compare the actual openings and reachable surfaces rather than relying on a broad style name. None of these heads removes lumps automatically; potato variety, cooking, draining, additions, and the number of passes all influence the result.

Who this is for

  • Home cooks who want to mash cooked potatoes directly in a suitable saucepan or mixing bowl.
  • Households that prefer some control over a smooth, chunky, or rustic texture.
  • Cooks who also prepare soft root vegetables or other foods explicitly covered by the utensil’s instructions.
  • Buyers who want a simple hand tool without a separate hopper, disc, or crank to assemble.
  • Kitchens with a pot and storage location that match the selected head width and handle length.

Who should skip it

  • Skip a basic masher if your priority is an exceptionally fine, uniform potato texture; a ricer or food mill may be a closer fit.
  • Choose another method if repeated downward pressing is uncomfortable for your hand, wrist, elbow, or shoulder.
  • Do not use a metal head in cookware whose care instructions prohibit metal utensils.
  • A broad plate is a poor match for a narrow pot even if it suits the batch volume.
  • Skip intricate head-and-handle joints if you need every food-contact surface to be visible and easy to reach during washing.

Handle shape changes the motion

Most mashers invite one of two hand positions. A vertical handle is held much like a large utensil, with pressure traveling down the shaft. A horizontal or loop-style top can place the palm over the tool. Either arrangement can work, but the wrist angle, force distribution, and storage footprint differ.

For a vertical grip, check circumference, contour, surface texture, and where the handle ends relative to the palm. A very thin handle can concentrate pressure; a thick one may be difficult for a smaller hand to wrap securely. Decorative ridges do not necessarily improve control once the grip is damp. Dimensions and clear side views are more informative than generic ergonomic wording.

For a horizontal grip, compare the width of the contact area and the clearance between the hand and shaft. This shape may distribute pressure across the palm, but it also creates a wider profile in a drawer. Anyone with limited grip strength should consider the complete movement with an empty utensil before applying force to hot food. A masher is a levered hand tool, not a medical or adaptive device unless the exact product is documented for that purpose.

Shaft stiffness and attachment are important under load. Look for a clear description of how the head connects to the handle and inspect the tool when it arrives. It should not show a loose joint, obvious distortion, rough edges, or a grip that rotates unexpectedly. These arrival checks cannot be confirmed from a search result alone.

What to verify before buying

  • Head dimensions: Compare width and shape with the usable bottom area and curves of your usual pot.
  • Working length: Confirm that the grip stays comfortably above the rim without making the tool unwieldy.
  • Head pattern: Look at hole or wire spacing in relation to the texture and cleanup routine you prefer.
  • Cookware compatibility: Check both the utensil material wording and your cookware care instructions.
  • Handle geometry: Review grip diameter or palm width, surface texture, orientation, and knuckle clearance.
  • Construction: Inspect seams, welds, molded joints, coatings, and any spaces where food or water could remain.
  • Care instructions: Verify whether the complete assembled tool is approved for the dishwasher or requires hand washing.
  • Temperature guidance: Do not leave the masher resting in hot cookware unless its instructions permit that use.
  • Storage: Measure drawer length and height, or confirm that any hanging opening fits a secure kitchen hook.
  • Package contents: Make sure the selected option includes the expected number and style of tools rather than accessories shown only for context.

Make the working motion predictable

A stable pot and a manageable amount of cooked food make mashing easier. Place the vessel on a level, heat-safe surface as directed for the cookware. Press in a deliberate pattern across the bottom instead of repeatedly striking one spot. Turning the pot or folding the contents between passes may expose larger pieces, but use a suitable second utensil and keep hands away from steam.

The head should contact food rather than be forced hard against the pot. Excess pressure does not compensate for potatoes that are insufficiently cooked, an overfilled vessel, or a head that cannot reach the corners. If the tool flexes significantly or the handle feels unstable, stop and inspect it rather than applying more force.

A masher also does not automate recipe timing. Potatoes can become gluey when handled aggressively, depending on the variety and method, while additions such as butter or milk change the mixture’s resistance. Follow a trusted recipe for preparation and use the masher to approach the desired texture gradually. The buying decision should support that workflow, not promise one guaranteed consistency.

Cleaning access can outweigh an extra feature

Starchy food dries into a stubborn film, especially inside perforations and around joints. Rinsing promptly, when allowed by the care instructions, can be easier than leaving the utensil until after dinner. A head that is reachable from both sides gives a brush and water a clearer path. Closely spaced wires or deep edge folds deserve extra inspection.

“Dishwasher safe” should apply to the entire masher, including the handle, finish, bonding, and any soft grip. Even then, a dishwasher may not remove material packed in small holes. Check the head before drying and storage. If water can enter a hollow handle or cap, follow the maker’s drying guidance rather than assuming the interior will drain.

One-piece construction can reduce the number of joints, but it does not guarantee that every contour is easy to clean. A separate grip may feel more comfortable while adding seams. Choose the compromise you are willing to wash carefully after a dense, starchy recipe.

Limitations

  • A hand masher can leave more texture variation than a ricer or food mill.
  • Broad heads may miss food around the curved sides of small cookware.
  • Perforations and tight wire patterns can retain potato until rinsed or brushed from both sides.
  • Repeated downward pressure may not suit every user’s hand or wrist comfort.
  • Metal, coated, and polymer heads have different cookware and temperature restrictions that must be checked for the exact model.
  • A potato masher should not be treated as a blender, chopper, or tool for hard raw foods.

Alternatives to compare

Potato ricer: Pushes cooked potato through many small holes for a finer, more uniform texture. It introduces a hopper, handles, and multiple surfaces to load and clean.

Food mill: Processes cooked food through a perforated disc using a crank or sweeping blade. It can suit larger preparation tasks, but requires more setup and storage space.

Sturdy fork: Useful for a small portion in a bowl and already present in most kitchens. The narrow working area makes a large batch slower and may provide less leverage.

Hand mixer: Can combine and smooth some recipes quickly, but speed makes overworking easier and beaters require their own safe handling and cleaning routine. Follow the recipe and appliance instructions.

Silicone or polymer masher: Worth comparing for cookware that should not contact metal. Heat limits, stiffness, head dimensions, and care requirements still vary by product.

FAQ

Is a perforated plate better than a wire potato masher?

Neither head is universally better. A perforated plate applies pressure through many small openings and may produce a more consistent crush, while an open wire pattern can be easier to clear and may suit a rustic texture. Compare both with your pot size and cleaning preferences.

How wide should a potato masher be?

The head should fit the flat and curved working area inside your usual pot with enough room to move across the batch. Measure that space rather than choosing the largest head. A smaller masher takes more passes but can reach vessels that a broad plate cannot.

Can I use a metal masher in a nonstick pot?

Only if the cookware maker’s care guidance allows that type of metal utensil. Many coated surfaces restrict metal contact. When metal is discouraged, compare a compatible nonmetal head and verify its current material and temperature guidance.

Why do potatoes get stuck in the masher holes?

Soft potato is pressed through enclosed openings and can remain there, especially after it begins to dry. A head reachable from both sides is easier to rinse or brush. Follow the care instructions and clean the utensil promptly rather than using a sharp object that could damage it or cause injury.

Does a potato masher make completely smooth mashed potatoes?

A masher can reduce lumps gradually, but its manual pattern often leaves more variation than a ricer or food mill. Ingredients, cooking method, batch depth, and the number of passes also affect texture. Compare another tool if uniform smoothness is the main goal.
Choosing a Garlic Press That Is Easy to Load, Squeeze, and Clean

Product links are for reference. Verify current details on the retailer page before buying.

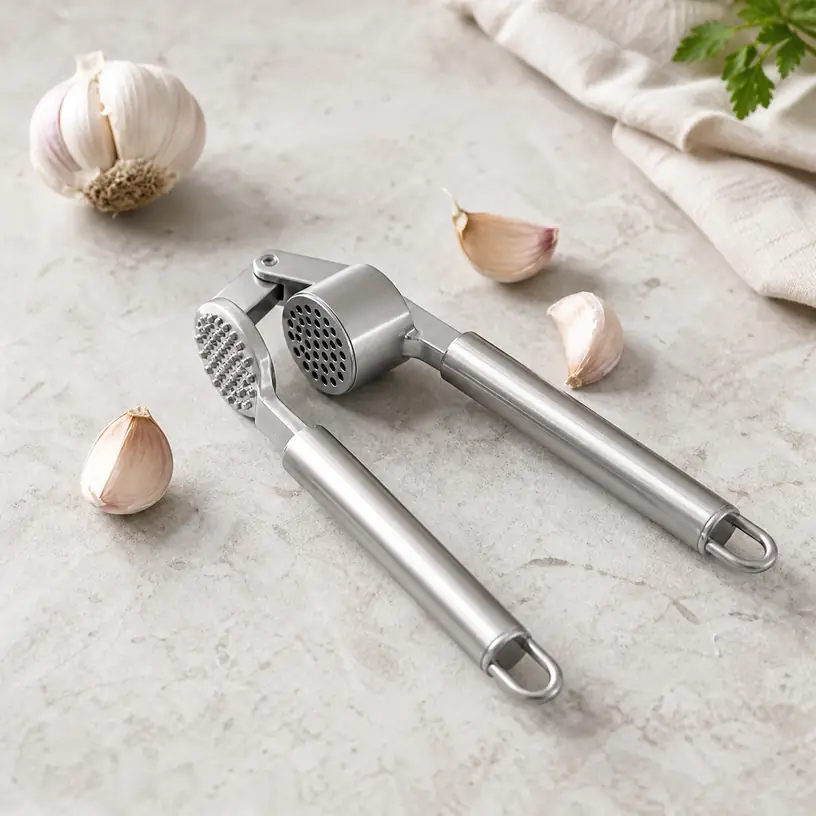
Illustrative image of a generic manual garlic press with garlic cloves on a kitchen counter

Illustrative image, not an official product photo.

Short answer

A useful garlic press should fit the cloves you normally prepare without turning one small job into several loads. Compare the inside of the chamber, the handle opening span, the amount of leverage available near the end of the squeeze, and how easily residue can be removed from the holes and hinge. A removable basket or cleaning grid may help, but only if the loose piece is simple to handle and store. Also decide whether you want to press peeled cloves only or are considering a model that is explicitly designed for another workflow. For most kitchens, predictable cleanup and a comfortable grip matter more than extra crushing, peeling, or slicing claims.

Search reference

Manual garlic press options

Compare chamber dimensions, handle reach, pressing plate alignment, cleaning access, stated clove preparation, and care instructions for your usual cooking routine.

View matching options

Notice what happens between the cutting board and the pan

A garlic press solves a narrow but common kitchen problem: reducing a clove to small pieces with a squeezing motion rather than repeated knife work. Whether that is convenient depends on the rest of the meal. One clove going into a skillet calls for a tool that opens, loads, and rinses quickly. A sauce made with a full head of garlic makes chamber capacity and repeated squeezing more important. Someone who enjoys the control of hand-mincing may not need a press at all.

Before comparing products, think through three recent recipes. Note how many cloves you used at once, whether you peeled them first, and whether the garlic went directly into hot cookware or into a mixing bowl. This reveals practical details that a generic feature list cannot: the press may need to fit over a narrow pan, rest without dripping on the counter, or reopen easily for a second load.

The texture produced by a press is also part of the decision. Pressed garlic is generally finer and releases moisture differently from slices or a rough knife mince. That can be welcome in dressings, sauces, and dishes where large pieces would be distracting. It does not replace every knife cut, however. If a recipe depends on intact slices, evenly sized pieces, or slowly cooked whole cloves, a press is the wrong preparation method regardless of its construction.

Chamber size is more useful than overall size

A substantial-looking tool may still have a shallow or narrow loading chamber. Look for internal length, width, and depth when those measurements are available. If listings provide only overall dimensions, inspect multiple images and verify capacity wording rather than assuming that several cloves will fit. Overfilling can keep the pressing plate from entering squarely, force garlic around the rim, and make the handles harder to close.

A broad chamber can reduce reloads, but it also creates a wider pressing surface. The handles and hinge must translate hand pressure across that area, and the remaining garlic skin or fibers still have to be removed. Buyers who usually prepare one medium clove at a time may prefer a smaller basket that is quick to clear. Batch cooks may accept a larger tool if the chamber opens widely and can be emptied without digging into sharp edges.

Notice the shape of the chamber opening. A long basket may accept an elongated clove but be awkward to wipe at the far end. Rounded corners are generally easier to reach than tight seams, though photos cannot confirm how smoothly parts meet. Check whether the basket is permanently attached, swings out, or lifts away, and consider where a removable part will sit during loading and washing.

Leverage and hand fit

Handle length influences leverage, but total length is not the same as comfortable operation. The first part of a squeeze may begin with the handles spread farther apart than expected. Measure the open span if it is listed and compare it with a pair of kitchen tongs or another tool you use comfortably. A long lever can reduce the force required later in the stroke while still demanding a wide initial reach.

Grip shape changes how that force reaches the hand. Thin metal edges, abrupt handle ends, or raised decorative details may create pressure points during repeated loads. Wider or contoured surfaces can distribute pressure, but added covers and inserts introduce joints that need cleaning and care. Product images can show the outline; only the current specifications can confirm dimensions and material wording.

Consider where your hand will be when the handles close. Pinch points can exist near the hinge or where one handle nests into the other. A stop or deliberate gap may help, but its presence and location should be verified. People with limited grip strength, hand pain, or restricted finger movement should not assume that a longer handle makes every press suitable; an alternative mincing method with a different motion may be more appropriate.

The pressing face and hole pattern

Most presses use a plate or plunger to force garlic through a perforated basket. The alignment between those surfaces matters. A plate that enters at an angle can leave more material around one side, while a close-fitting design may push more of the clove through but require careful cleaning along its edges. Marketing phrases about yield do not replace a clear view of how the mechanism meets.

Hole size affects the resulting texture and the effort of clearing residue. Very small holes can create a fine output, yet they provide more openings where fibers can remain. Larger perforations may release coarser pieces and can still clog if the clove is dry or the basket is overloaded. Neither pattern guarantees effortless pressing. Match the texture to the recipes you make and the cleanup to the time you are willing to spend after cooking.

Some designs include pins or a hinged cleaning grid that push backward through the perforations. Others provide a separate brush or rely on running water and a utensil. A built-in cleaner stays with the press but adds a moving surface; a separate tool can reach from different angles but is easier to misplace. Verify that any pin grid actually corresponds to the hole pattern and that it can be moved without putting fingers against rough or sharp areas.

Who this is for

  • Cooks who often want finely pressed garlic for sauces, dressings, marinades, soups, or quick skillet meals.
  • Households looking for an alternative to repeated rocking cuts with a knife for one or two cloves.
  • Batch cooks who can match chamber capacity and handle comfort to several consecutive loads.
  • Buyers willing to rinse or clean the chamber promptly before garlic residue dries in the perforations.
  • Shared kitchens where a dedicated prep tool can provide a repeatable texture across different cooks.

Who should skip it

  • Skip a press if you prefer distinct slices, coarse pieces, or the visual control of hand-mincing.
  • Avoid adding one if a knife, microplane-style grater, or other tool already covers the task comfortably and is easier for you to clean.
  • A small fixed basket may frustrate cooks who regularly prepare many cloves at once.
  • Do not choose a model that requires an opening span or squeezing force that is uncomfortable for the intended user.
  • Skip designs with inaccessible seams or loose cleaning parts if you know they will remain unrinsed or get lost in your kitchen.

What to verify before buying

  • Usable chamber dimensions: Compare the inside capacity with typical clove size and the number of cloves you expect to load.
  • Clove preparation: Confirm whether the instructions call for peeled garlic and do not infer peel handling from an image or broad claim.
  • Handle geometry: Check total length, open span, grip width, closed gap, and any likely pinch points.
  • Pressing mechanism: Inspect how the plunger aligns with the basket and how far the chamber opens for loading and emptying.
  • Hole pattern: Consider the expected texture, number of perforations, and access from both sides for cleaning.
  • Cleaning features: Verify whether the basket removes or swings out, whether a pin grid or brush is included, and how each part is used.
  • Care guidance: Read current hand-wash or dishwasher instructions and note any drying, hinge, or finish precautions.
  • Food-contact materials: Use the exact current listing and manufacturer wording rather than guessing from color, weight, or appearance.
  • Storage footprint: Measure the closed press and decide whether it will lie safely in a drawer or hang from a suitable loop.

Cleanup begins before the garlic dries

Fresh residue is usually easier to remove than the thin layer left after a press sits beside the stove through dinner. Plan a landing place before cooking: a small plate near the sink can keep garlic from smearing across a drawer or counter. When the press is no longer needed, open it fully and follow its care directions rather than leaving the chamber closed.

Access from both sides of the basket is valuable. Water may loosen the soft material, while an appropriate brush or the included cleaner can address individual holes. Keep fingers away from burrs, narrow seams, or edges that cannot be seen clearly. If the basket lifts out, wash and dry it without letting the small component disappear under larger cookware. Reinstall it only in the orientation specified for the tool.

Dishwasher suitability must be confirmed for the exact model and all of its components. A dishwasher statement does not ensure that every perforation will emerge clear, nor does it eliminate the need to dry a hinge or nested surface. If hand washing is required, check whether an ordinary dish brush can reach the chamber. A complicated cleaning routine can outweigh seconds saved during mincing.

Odor can linger when residue remains around the pivot, under an insert, or inside a handle joint. That is another reason to favor visible, accessible construction. It is better to choose a simple mechanism you will clean promptly than an intricate tool whose extra functions create hidden surfaces.

Pressing peeled and unpeeled cloves

Some garlic presses are marketed for loading cloves with their papery covering still attached. Treat that as a model-specific workflow, not a universal property of the product type. Read the instructions to confirm what kind of peel, quantity, and chamber loading are intended. Even where unpeeled use is supported, the remaining skin must be removed between loads and may reduce usable capacity.

Peeling first gives you a chance to trim the root end, inspect the clove, and remove damaged areas before it enters the chamber. It also changes the residue left behind. Whether that preparation feels like unnecessary work or a sensible inspection step depends on how you cook. Choose based on the complete workflow—peeling, loading, pressing, clearing, and washing—not just the moment when the handles close.

Do not use the press for ginger, nuts, spices, or other foods unless the product instructions explicitly include them. Hardness, fibers, and moisture vary, and a chamber designed around garlic may not handle another ingredient safely or effectively. A broad list of possible uses should be checked against current manufacturer guidance.

Storage and durability clues

A garlic press is often too bulky for a flatware tray but small enough to vanish beneath larger utensils. Measure it closed and assign a location where the handles cannot spring open or snag nearby tools. If it has a hanging loop, make sure the hook supports the tool without placing the basket at eye or hand level. A removable insert should remain paired with the body, perhaps in a fitted compartment rather than loose in the drawer.

Durability cannot be established from a shiny finish or heavy feel alone. Look at the hinge type, attachment points, handle flex described in the specifications, and whether the pressing plate appears supported throughout its travel. Verify current material and care claims rather than equating one material label with a guaranteed service life. Proper loading matters too: forcing an overfilled chamber or pressing an unintended hard ingredient can strain even a sturdy-looking mechanism.

A press with several joints may offer excellent access, but each hinge or removable section adds an interface to inspect. A one-piece basket may have fewer loose parts while being harder to reach. The practical choice is the design whose moving surfaces you can understand, clean, dry, and store consistently.

Limitations

  • A garlic press produces a particular fine texture and cannot replace slices, rough chopping, or whole-clove preparation.
  • Chamber capacity shown in photos can be misleading without internal measurements and clear loading guidance.
  • Longer handles may improve leverage but can require a wide opening span and more drawer space.
  • Fine perforations and close-fitting plungers can retain garlic fibers even when a cleaning feature is included.
  • Comfort, hinge resistance, and pinch risk are difficult to judge from specifications alone.
  • Claims about pressing unpeeled cloves or handling other ingredients apply only when confirmed for the exact model.

Alternatives to compare

  • Use a chef’s knife for full control over slices, a coarse chop, or a fine mince on a stable cutting board.
  • Compare a rocker-style garlic crusher if a two-handed downward motion feels more natural than squeezing handles.
  • A fine grater can produce a paste-like texture, though it requires careful finger clearance and has its own cleaning needs.
  • Consider a small manual chopper for larger batches when its blade handling, container, and cleanup fit the task.
  • Use a mortar and pestle when crushing garlic with salt or spices is part of the recipe and the bowl size suits the quantity.

FAQ

Do garlic cloves need to be peeled before using a press?

That depends on the exact press. Some models provide instructions for cloves with papery skin, while others are intended for peeled garlic. Check the current guidance and remember that any retained peel still has to be cleared from the chamber between loads.

How large should a garlic press chamber be?

Choose around the cloves and batch size you actually prepare. Internal dimensions are more informative than the overall tool length. A chamber should accept the intended load without crowding the rim or preventing the pressing plate from entering squarely.

Are removable-basket garlic presses easier to clean?

A removable basket can expose more surfaces, but it also creates a small part that must be handled, dried, reinstalled correctly, and stored. Compare that full routine with a fixed basket that opens widely and can be reached from both sides.

Why does garlic stay inside the press?

Some residue is expected because skin, fibers, and flattened material may not pass through the perforations. Overloading, poor plate alignment, or a hole pattern mismatched to the clove can leave more behind. Follow the loading instructions and clear the chamber before residue dries.

Can a garlic press be used for ginger or nuts?

Only if the instructions for that specific model identify the ingredient and method. Ginger fibers and hard foods place different demands on the chamber and hinge, so appearance alone is not evidence that the press is suitable.