Before You Buy a Foil and Plastic Wrap Organizer, Measure the Whole Drawer
Product links are for reference. Verify current details on the retailer page before buying.
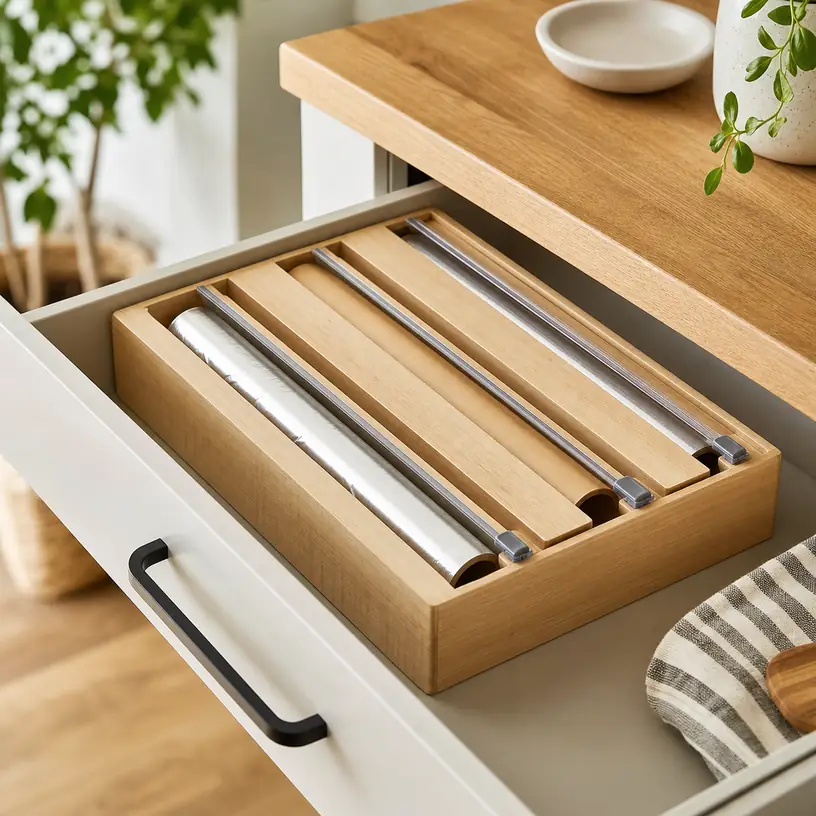
Illustrative image, not an official product photo.
Short answer
Do not size a wrap organizer from its outside length alone. First measure the drawer’s clear internal width, depth, and height, then repeat the height measurement under any rails, handle screws, or countertop overhang that the organizer must pass. Measure the rolls now in the kitchen too: package width, roll diameter, and the space required to load a replacement all matter. Decide whether you want to keep original boxes, move rolls into a dispenser, or simply divide a drawer. An integrated cutter can reduce loose boxes, but only if the roll turns freely, the cutting carriage is easy to reach, and the complete unit can be cleaned and refilled without an awkward struggle.
Search reference
Foil and plastic wrap organizers with cutters
Compare usable roll compartments, drawer clearance, refill access, cutter guards, mounting details, and cleaning instructions for the exact materials you store.
View matching optionsStart with the route into the drawer
A product can match the drawer’s rectangular measurements and still refuse to go in. Many drawers have a narrower opening than the cavity behind the face. Side rails, a lowered countertop edge, a center support, or screws from the handle can also reduce usable clearance. Measure the opening through which the organizer will travel as well as the space where it will rest. If the unit is wider than the opening, tilting it may help only when there is enough height and depth to rotate it safely.
Empty the drawer before measuring. Record width at the front and back, depth on both sides, and height at several points. Older cabinets and drawer liners may not be perfectly square. Subtract room for finger access, normal drawer movement, and any liner that bunches at the edges. A tight friction fit may look efficient, but it can make removal for cleaning difficult and can transmit every pull on a cutter to the drawer sides.
Next, close the empty drawer slowly while watching the space above it. Tall rolls, raised knobs, protruding cutter carriages, and tabs can catch even when the organizer body sits below the rim. If the product will stand on a counter or mount to a wall instead, measure the working area in front of it. A dispenser needs more than storage depth; someone must be able to pull material forward and complete a cut without striking a backsplash, cabinet door, or nearby appliance.
Who this is for
- Households that keep two or more rolls of foil, parchment, plastic wrap, or similar kitchen material in one frequently used drawer.
- Cooks who want each roll to remain in a fixed position rather than stacking original boxes that shift when the drawer closes.
- People prepared to measure current rolls and check new refills instead of assuming every package uses the same core, width, or diameter.
- Small kitchens where consolidating compatible wraps can release useful drawer or shelf space.
- Buyers who prefer an enclosed sliding cutter or another clearly documented cutting method over torn boxes and exposed serrated edges.
- Renters who choose a drawer insert or another nonpermanent arrangement that does not require altering cabinets.
Who should skip it
- Anyone whose drawer opening, interior height, or rail layout leaves no comfortable clearance around a rigid organizer.
- Households that regularly buy unusually wide, thick, or high-capacity rolls without confirmed compartment dimensions.
- People who want to preserve package instructions, material identification, or date information but have no plan to transfer those details when a roll leaves its box.
- Shared kitchens where users may not recognize which unlabelled roll is foil, parchment, waxed paper, or plastic wrap.
- Buyers who cannot mount a wall or cabinet unit using the specified method and suitable substrate.
- Kitchens where a simple adjustable divider already keeps original boxes orderly without adding refill steps or another item to maintain.
What to verify before buying
- Drawer opening and cavity: Compare the narrowest opening, internal width, depth, height, rail position, and handle hardware with the organizer’s complete external dimensions.
- Usable roll space: Check each compartment’s internal width and diameter allowance, not just the unit’s overall length or the number of rolls shown.
- Loading direction: Determine whether refills enter from an end, the top, a hinged panel, or a removable rod, and reserve room for that movement.
- Roll control: Look at how the core is supported and whether a partly used roll can unwind without drifting, binding, or collapsing into the compartment.
- Material separation: Confirm that each stored wrap remains identifiable after original packaging is removed and that labels can be updated without blocking operation.
- Cutter design: Verify which materials the cutter is intended to handle, where its working edge rests, how fingers stay clear, and whether the carriage can be replaced.
- Pulling direction: Check whether the dispenser is designed for in-drawer, countertop, vertical, or under-cabinet use; the same mechanism may not work securely in every orientation.
- Mounting system: For mounted units, inspect fastener type, hole spacing, required tools, supported surfaces, installation template, and removal consequences.
- Base stability: A counter unit should resist sliding or tipping while material is pulled. An in-drawer model should not slam into the drawer walls.
- Cleaning access: Read the care instructions for the body, cutter channel, rod, finish, labels, adhesives, feet, and mounting parts.
- Replacement parts: Find out whether cutter carriages, labels, rods, or other wear items are available and specific to the model.
- Package contents: Confirm that product photos do not imply rolls, labels, mounting hardware, or extra cutters that are not actually included.
A three-slot organizer does not fit every set of three rolls
Slot count is only a rough description. Foil, parchment, and plastic wrap can arrive in packages with different widths and roll diameters, and larger refills may grow in diameter even when the material width stays familiar. Measure the physical rolls you expect the dispenser to hold, including a newly purchased full roll rather than only the nearly empty one in the drawer.
The core matters as well. Some dispensers use a rod through the center; others cradle the roll or depend on end caps. Compare the supported core range and loading mechanism with the refills you buy. A roll that technically enters the compartment may still bind if its sides rub the walls or if the core sits off center. Plastic wrap also behaves differently from stiff foil when it clings to itself, so a smooth material path and accessible leading edge are important.
Think about substitutions. If one slot normally holds parchment but occasionally stores waxed paper or a roll of bags, will everyone know what is loaded? Original boxes carry instructions and identity information that a bare roll does not. Retain relevant package information and use clear, changeable labels. Do not treat look-alike materials as interchangeable in cooking; follow the material maker’s current directions and the recipe or appliance instructions.
A little unused compartment width is useful for loading and rotation. Too much can allow the roll to shift sideways, creating an angled feed into the cutter. Look for documented internal dimensions or adjustment features rather than inferring fit from styled photos. When dimensions are incomplete, outline the proposed unit and roll positions with paper in the drawer before deciding whether the arrangement will improve access.
The refill motion needs its own space
The best time to discover a loading problem is before the organizer is wedged between other drawer inserts. A top-loading unit needs enough vertical clearance to lift a full roll over the compartment wall. A removable rod may need several inches of free space at one end. A hinged lid can collide with the cabinet frame, and an end cap can become inaccessible when the organizer is installed flush against a divider.
Imagine replacing the roll with the drawer in its normal position. Can the unit stay in place, or must the entire organizer be lifted out? If it must be removed, is there a safe place to set it while handling the roll? A long rigid body filled with several rolls can be awkward to turn in a narrow kitchen. Finger recesses or a clear gripping area may matter more than a perfectly filled drawer.
Before discarding any original packaging, load one roll and make a short trial feed according to the product instructions. Confirm that the material exits in the intended direction and that the leading edge remains available for the next use. Store the package information until you know the refill is compatible and clearly labelled.
Treat the cutter as a tool, not a decoration
Integrated cutters may use a sliding carriage, a recessed edge, or another mechanism. The product documentation should state which materials each cutter is intended to cut. A mechanism that handles foil acceptably may behave differently with thin cling film or heavy paper. Do not force a jammed carriage or substitute a material the instructions do not cover.
Look at the rest position. A working edge should not be where a hand naturally grips the organizer or searches for a loose end. A slider should move along a stable track without requiring fingers to cross the material path. If separate carriages serve adjacent rolls, clear labels or distinct positions can reduce confusion. Keep the area inaccessible to children if the design or household setup requires it, and follow the maker’s storage and use guidance.
A clean cut also depends on the dispenser staying still. On a counter, pulling a long sheet can drag a lightweight unit forward. Inside a drawer, the same force can make the organizer strike the sides or lift at one edge. Feet, a broad base, drawer fit, or the specified mounting hardware may help, but verify how the product is meant to resist the pull. Do not improvise screws or adhesive strips on a design that was not intended for them.
Food residue, dust, and scraps can collect in cutter tracks. Check whether the carriage, lid, or rod can be removed for cleaning and how to protect the working edge during that process. Follow the documented care method rather than soaking a wood body, putting an unknown assembly in a dishwasher, or probing the track with bare fingers.
Drawer insert, counter dispenser, or mounted rack?
An in-drawer insert keeps the counter clear and the cutters out of the main work area. It depends on drawer clearance and may occupy most of a shallow drawer. Pulling material while the drawer is open also changes the leverage on the slides, so use the mechanism as directed and avoid leaning on the drawer.
A countertop dispenser is quick to reach and easier to refill when there is open space around it. It remains visible, collects normal kitchen dust, and needs a stable location away from heat, water, and the edge of the counter. Measure the footprint with material extended into the working zone, not only the storage position.
A wall or cabinet-mounted organizer can release a drawer, but mounting is a separate project. Confirm the substrate, hidden utilities, fasteners, weight and pulling forces, door swing, and clearance around the loaded rolls. Renters should obtain permission where needed. Adhesive attachment is not automatically suitable for a repeated pulling load merely because a surface is smooth.
Some units advertise more than one orientation. Verify that the loading doors, roll supports, labels, and cutters are designed to operate in every claimed position. A body that can be physically turned sideways is not necessarily a functional wall dispenser.
Build a simple restocking routine
Consolidated storage removes the visual cue of a branded box becoming empty. Keep one replacement location and decide when a roll is low enough to add it to the shopping list. Avoid overfilling a compartment with a new roll before the old one is used; two layers can interfere with rotation and conceal scraps.
When changing materials, remove fragments from the track, inspect the cutter and supports as the instructions recommend, and update the label before the organizer returns to service. Keep relevant instructions from the refill packaging in a nearby file or photograph them clearly if the household relies on them. The organizer should reduce drawer clutter without erasing information needed to use each material appropriately.
Periodically lift the unit out and check the drawer beneath it. Loose foil edges, crumbs, and moisture can go unnoticed under a large insert. Clean and dry the organizer and cabinet according to their separate care requirements before reassembly. If the cutter becomes damaged, stop using that channel until the specified part can be repaired or replaced.
Limitations
- Compartment dimensions are not always reported as clearly as the organizer’s exterior dimensions.
- A refill that fits today does not guarantee that a differently sized package will fit later.
- Removing rolls from their boxes can separate materials from useful identity and usage information.
- Integrated cutters add tracks and moving parts that can jam, dull, collect debris, or require model-specific replacements.
- A large in-drawer unit may consume space that adjustable dividers could use more flexibly.
- Countertop models remain visible and require open pulling space, while mounted models introduce installation constraints.
- Wood, plastic, metal, finishes, adhesives, labels, and cutter assemblies may require different cleaning methods.
- No organizer makes foil, parchment, waxed paper, and plastic wrap interchangeable for cooking or storage tasks.
Alternatives to compare
An adjustable drawer divider keeps retail boxes upright while preserving their labels and built-in cutters. A long basket or open tray groups boxes without committing to fixed roll compartments and can be lifted out for cleaning. A vertical file-style rack uses cabinet height and leaves each package intact, though box widths and shelf clearance still matter. A door-mounted basket can free a drawer if the door, hinges, clearances, and mounting method support the arrangement. For households that use one roll much more than the others, a single-roll dispenser plus boxed storage may be easier to refill and replace than a large all-in-one unit.
FAQ
How do I measure a drawer for a foil and plastic wrap organizer?
Remove the contents and measure the narrowest drawer opening plus the internal width, depth, and height at several points. Note rails, handle screws, liners, and any reduced clearance under the cabinet frame. Compare those measurements with the organizer’s complete external dimensions and leave room to lift, tilt, refill, and clean it.
Will any standard roll fit a wrap organizer?
No universal fit should be assumed. Measure the full refill’s material width, outside diameter, and core, then compare them with each compartment and support mechanism. Check the loading path too; a roll may fit inside yet be impossible to insert when the organizer is in its final position.
Is it better to keep foil and plastic wrap in their original boxes?
Original boxes preserve identification, instructions, and a cutter chosen for that packaged material. A dispenser can consolidate storage and replace damaged boxes, but it adds compatibility, labelling, cleaning, and cutter questions. Choose the arrangement that keeps each material identifiable and easy to use correctly in your kitchen.
Can a drawer organizer also be mounted on a wall?
Only when the current product instructions explicitly support that orientation and provide an appropriate installation method. Mounting changes the pull direction and the load on the body and fasteners. Verify the wall or cabinet substrate, hardware, clearances, refill access, and cutter operation rather than improvising a mount.
How should I clean a wrap organizer with cutters?
Follow the maker’s instructions for every component. Remove rolls and secure or avoid the cutting edge before working near the track. Use only the recommended cleaning method, let all appropriate parts dry fully, and do not submerge, machine-wash, or dismantle the unit unless its documentation permits it.