Y-Shaped or Straight? Choosing a Vegetable Peeler for Everyday Prep
Product links are for reference. Verify current details on the retailer page before buying.
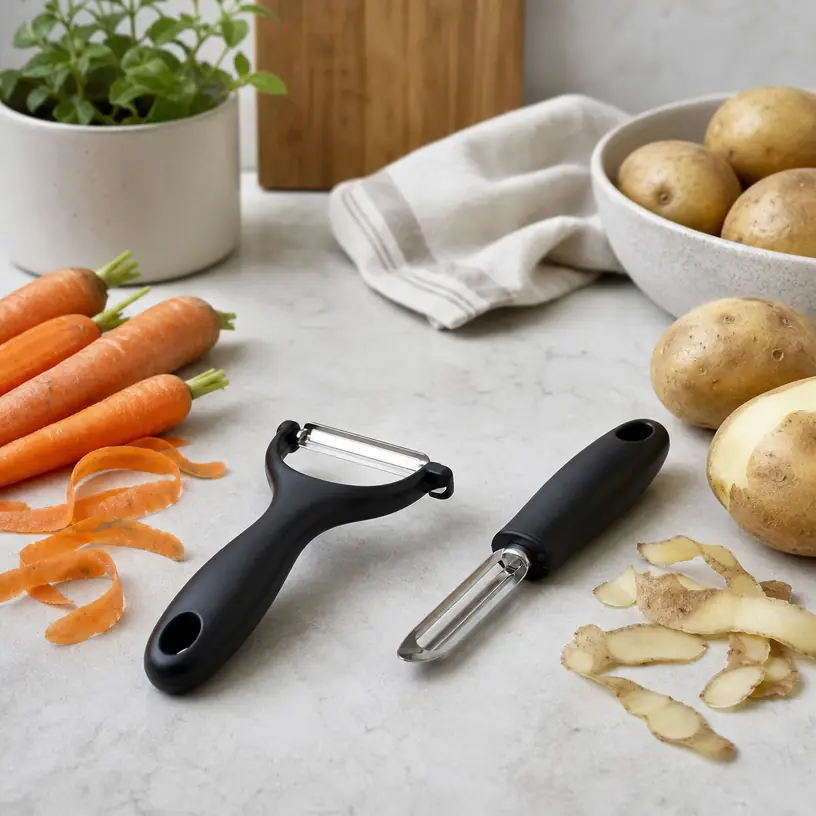
Illustrative image, not an official product photo.
Short answer
Start with the motion that feels natural in your hand. A Y-shaped peeler places the blade across the top of the handle and often suits broad, repeated strokes on potatoes, carrots, and similar produce. A straight swivel peeler holds the blade in line with the handle, which some cooks find easier to guide around curves or use with a paring-knife-like grip. Neither shape is universally more precise. Compare the usable blade width, degree of blade movement, handle thickness, cutting direction, cleaning access, and storage method. If possible, mimic the peeling motion with a similarly sized utensil before choosing. A comfortable, controllable tool used on a stable cutting surface is more useful than an elaborate set with extra blades you will not reach for.
Search reference
Vegetable peelers for everyday kitchen prep
Compare Y-shaped and straight designs, then verify blade type, handedness, handle dimensions, care instructions, and the pieces included in the current listing.
View matching optionsBegin with your usual peeling motion
A peeler is a small purchase with a surprisingly personal fit. Two people can use the same blade and disagree about control because they hold the produce differently, pull in different directions, or rely on different parts of the hand. Before comparing sets and accessories, picture an ordinary prep session: three potatoes for dinner, a few carrots for soup, or an apple whose curved surface requires shorter strokes. That routine reveals more than a long feature list.
Pay attention to whether you normally draw a tool toward yourself, push it away, or alternate directions. Also note where the work happens. Peeling over a deep sink, above a bowl, or on a board changes the wrist angle and the room available for each stroke. Safer handling instructions for a particular tool take priority, but understanding your habitual setup helps you reject a handle shape that would feel cramped from the start.
Produce shape matters too. Long carrots offer a relatively open path, while small potatoes require frequent repositioning. Wide squash, thin-skinned fruit, and irregular roots create different demands, and not every item should be handled with the same tool. The goal is not to find a peeler for every possible ingredient. It is to choose one that matches the foods you actually prepare and to use another suitable method when the shape, skin, or firmness calls for it.
Who this is for
- Home cooks replacing a dull, uncomfortable, or hard-to-clean everyday peeler.
- First-apartment and shared-kitchen shoppers who want one compact prep tool rather than a large gadget set.
- People deciding between a crosswise Y-shaped blade and an in-line straight swivel design.
- Cooks who prepare potatoes, carrots, apples, or similar produce often enough for handle comfort and cleaning access to matter.
- Households comparing a single general-purpose peeler with a set that includes specialized blade styles.
What to verify before buying
- Blade orientation: Confirm whether the tool is Y-shaped, straight, fixed, or swivel. Listing photos can make the orientation hard to judge without a side view.
- Cutting direction and handedness: Check whether the blade cuts in both travel directions and whether the design is described for right-handed, left-handed, or ambidextrous use. Do not infer this from symmetry alone.
- Handle dimensions: Look for length, width, thickness, and contour details rather than relying on words such as ergonomic or comfortable.
- Blade description: Review the current blade material and edge wording, but do not assume that a material name alone predicts sharpness, control, or service life.
- Gap and shaving thickness: If the listing provides a clear blade-gap or intended-use description, compare it with the produce you prepare. A wide opening is not automatically more efficient.
- Care instructions: Verify whether hand washing or machine washing is recommended and whether food can collect around pivots, guards, seams, or decorative inserts.
- Storage details: Check for a blade cover, hanging hole, locking feature, or case if the tool will share a drawer with other utensils.
- Set contents: For multipacks, identify the purpose and edge type of every piece. Similar-looking peelers may be intended for different cuts.
Y-shaped peelers favor a broad, crosswise approach
The crossbar on a Y peeler puts the working edge ahead of the hand. That layout can feel direct when the produce rests on a board and the user makes long strokes along its surface. The handle is often held with the fingers wrapped around it while the thumb and wrist guide the tool, although the correct grip depends on the particular design and its instructions.
Look beyond the overall silhouette. A very wide crossbar may give the hand clearance over a broad vegetable but feel awkward around a small curve. A narrow head can be easier to position yet cover less surface with each pass. The distance between the handle and blade also affects whether knuckles, fingers, or produce crowd one another. Dimensioned drawings are more helpful here than isolated product photos.
Some Y peelers have a modestly moving blade, while others may be described differently. The blade should follow the intended surface without feeling uncontrolled, but the appropriate amount of movement is difficult to assess from an image. Check the mechanism and return policy described by the seller, and inspect the tool when it arrives before using it on food. Loose, damaged, or misaligned parts are a reason to stop rather than compensate with more pressure.
A Y design can occupy more drawer width than a narrow straight peeler. If utensils are tightly packed, consider whether the exposed crosswise blade could be bumped during retrieval. A suitable cover or a dedicated organizer section may be more valuable than an additional specialty edge.
Straight swivel peelers use an in-line grip
A straight peeler resembles a narrow-handled utensil with the blade positioned along its axis. Some cooks prefer this shape because it can be rotated and guided around curved produce without changing to a broad crosswise grip. Others find that the in-line arrangement asks more of the fingers or places the wrist at an uncomfortable angle. The distinction is about fit and technique, not a universal ranking.
Examine the blade end from several views. Head width, tip shape, side guards, and the transition into the handle determine how close the working edge can approach an indentation or narrow section. A pointed feature sometimes included near the blade may be intended for removing blemishes, but its purpose and safe use should be confirmed in the current instructions. It does not replace inspecting produce and removing unsuitable portions according to food-safety guidance.
Handle profile is particularly important on a straight tool. A slim round handle may rotate easily in storage and in the hand; a wider oval or faceted shape may resist rolling and provide a more defined orientation. Surface texture can assist grip, but deep grooves and mixed-material seams may take more attention to clean. Choose based on the entire construction rather than treating softness or texture as proof of comfort.
Handle comfort is more than a padded surface
A handle works when the hand can maintain control without squeezing harder than necessary. Thickness, taper, balance, surface condition, and the distance from grip to blade all contribute. A heavily padded handle can be bulky for a smaller hand, while a thin metal or rigid handle may feel tiring to another user. Marketing labels cannot settle that difference.
Use listed dimensions to make a simple comparison with a utensil already in your kitchen. Hold that utensil in the position you would use for peeling, without making contact with food or a sharp edge, and notice where the fingers overlap and where the thumb rests. This is not a substitute for trying the actual peeler, but it can expose an obviously short, thick, or narrow option before purchase.
If grip strength, hand motion, sensation, or joint comfort is a concern, avoid assuming that a general ergonomic claim meets an individual need. Seek appropriate professional guidance when relevant and consider adaptive kitchen tools designed for the specific situation. A standard peeler should not be presented as a treatment or guaranteed accessibility solution.
Wet hands, smooth handles, and loose produce can combine into poor control. Dry the handle and work area as needed, stabilize the food on a suitable surface, and keep fingers outside the blade path. Follow the manufacturer’s directions and use a different prep method if the item cannot be held securely.
Swivel movement, edge style, and specialty sets
A swivel blade is meant to adjust its angle as it travels across changing contours. Too little movement may require frequent wrist correction; too much perceived play can make placement uncertain. Because listings rarely communicate this feel well, inspect the pivot and blade alignment before first use. Never test sharpness with a fingertip. If the mechanism appears damaged or the edge is exposed in an unintended way, do not use it.
Standard smooth edges are the straightforward starting point for many routine peeling jobs. Serrated or julienne-style edges may be offered separately or in coordinated sets, but they perform different tasks and can require different techniques. Confirm which piece is which, how each should be handled, and whether blade covers are included. Color coding is useful only if household members remember the system.
A three-piece set can appear versatile while creating two unused sharp tools in a drawer. Buy the set when its distinct functions match recurring recipes, not merely because the pieces are bundled. For occasional strips or decorative cuts, another tool already in the kitchen may be adequate. Fewer well-stored utensils can make prep safer and faster than a crowded collection.
Replaceable blades and integrated sharpeners sometimes appear in product descriptions. Verify compatibility, replacement availability, maintenance steps, and safe installation rather than assuming these features extend service indefinitely. Many simple peelers are not designed for user sharpening. Follow the specific care guidance and replace a damaged tool appropriately.
Cleaning and storage deserve a close look
Peel fragments and moisture can settle near a swivel pivot, under a crossbar, or along a handle seam. Look for clear access around these areas and read the stated washing method. A machine-washable claim does not necessarily mean every rack position, detergent, or drying cycle is appropriate, so follow the current instructions for the complete tool.
Rinse or wash the peeler promptly as directed, using a method that keeps hands away from the edge. A brush intended for utensil cleaning may help reach narrow spaces if the manufacturer permits it. Let the tool dry fully before placing it in enclosed storage. Corrosion resistance, when claimed, does not make good cleaning and drying practice unnecessary.
An uncovered peeler should not disappear beneath ladles, whisks, and other drawer contents. Use the supplied blade guard when it is designed for storage, or keep the tool in a suitable compartment that limits accidental contact. Confirm that a cover fits securely without requiring fingers to pass along the cutting edge. Hanging storage can keep the tool visible, but only if the attachment point and location are stable and out of unsafe reach.
Who should skip it
- Someone who rarely peels produce may be better served by a suitable tool already on hand rather than another single-purpose utensil.
- A standard manual peeler may not meet an individual accessibility need; consider purpose-designed alternatives and appropriate advice.
- Households unable to provide protected storage should address that issue before adding another exposed blade to a crowded drawer.
- Cooks expecting one peeler to handle hard rinds, large squash, delicate garnishes, and every irregular ingredient may need several task-appropriate methods instead.
- A multipiece specialty set is poor value when only the standard smooth edge matches the household’s recipes.
Limitations
- Handle comfort is subjective and cannot be confirmed from measurements or product photos alone.
- A wider blade does not guarantee faster preparation; produce shape, technique, and control affect each stroke.
- Material labels do not establish edge quality, durability, corrosion performance, or cleaning ease by themselves.
- A swivel mechanism includes spaces that may need careful cleaning and inspection.
- Blade guards, hanging holes, blemish-removal features, and specialty edges vary by model and set.
- Manual peelers still require stable food positioning, a clear cutting path, and attention to the manufacturer’s safety directions.
- Product listings and set configurations can change, so check the current dimensions, blade descriptions, care guidance, and included pieces before ordering.
Alternatives to compare
- A suitable paring knife for users with the skill and a task that calls for knife work, following proper handling guidance.
- An adaptive peeler with a different handle angle or stabilizing feature for a clearly identified accessibility need.
- A tabletop or crank-style preparation tool when its setup, cleaning, and supported produce types match the household routine.
- Leaving edible skins on when appropriate for the ingredient, recipe, personal preference, and relevant food guidance.
- Buying pre-prepared produce for occasions when time or physical effort matters more than adding another kitchen tool.
- Keeping one familiar general-purpose peeler instead of purchasing a set of specialized edges that will see little use.
FAQ
Is a Y peeler better than a straight peeler?
Neither layout is better for every cook. A Y peeler offers a crosswise head that can feel natural for broad strokes, while a straight peeler uses an in-line grip that some people prefer around curves. Compare both shapes with your normal hand position, produce, and work surface, then prioritize controlled movement over speed.
Can left-handed cooks use the same vegetable peeler?
Only if the current design and blade are suitable for the intended direction of use. Some peelers are described as ambidextrous or able to cut in both directions, while others are not. Verify the listing and instructions instead of assuming that a symmetrical handle settles handedness.
Should I buy a swivel or fixed-blade peeler?
A swivel blade can adjust to changing contours, while a fixed design may feel more predictable to a user who prefers less blade movement. The useful choice depends on technique and produce shape. Confirm the actual mechanism, inspect its alignment, and follow its directions before use.
Are vegetable peelers dishwasher safe?
Care methods vary with the blade, handle, pivot, coating, and other components. Use a dishwasher only when the current manufacturer instructions permit it, including any rack-placement guidance. Otherwise follow the recommended hand-cleaning method while keeping fingers away from the edge.
When should a vegetable peeler be replaced?
Stop using a peeler if the blade, pivot, handle, guard, or attachment is damaged, loose, cracked, or misaligned. Declining control or a tool that no longer performs as intended also deserves attention. Follow the manufacturer’s maintenance and replacement guidance rather than trying an unapproved sharpening or repair method.